Position Sizing and Risk Management in Swing Trading: Stop-Loss First, Size Second
Imagine two traders looking at the exact same chart, performing the exact same analysis, yet finishing the month with completely different results. The secret usually isn't in predicting the future direction; it is in how much they risked when they were wrong.
In the previous article, When Regime and Scenario Disagree, when market conditions and scenarios didn't align, we reached a core rule: lower confidence should be reflected as a smaller position size, not a larger bet. This article explains how to turn that rule into actual numbers.
The method is simple: decide where your idea is invalidated, decide how much money you are willing to lose if it is invalidated, and let these two numbers determine your position size. Leverage, total account size, and confidence are inputs to this calculation, not replacements for it.
1. Risk First, Buy Second!
Most beginners start from the end: "I want to buy a whole Bitcoin!"
But professional traders start by figuring out how much money they are willing to put on the line:
Risk Per Trade: The exact amount of money you lose if your trade hits its stop-loss (usually expressed as a percentage of your total account balance).
Position Size Formula:
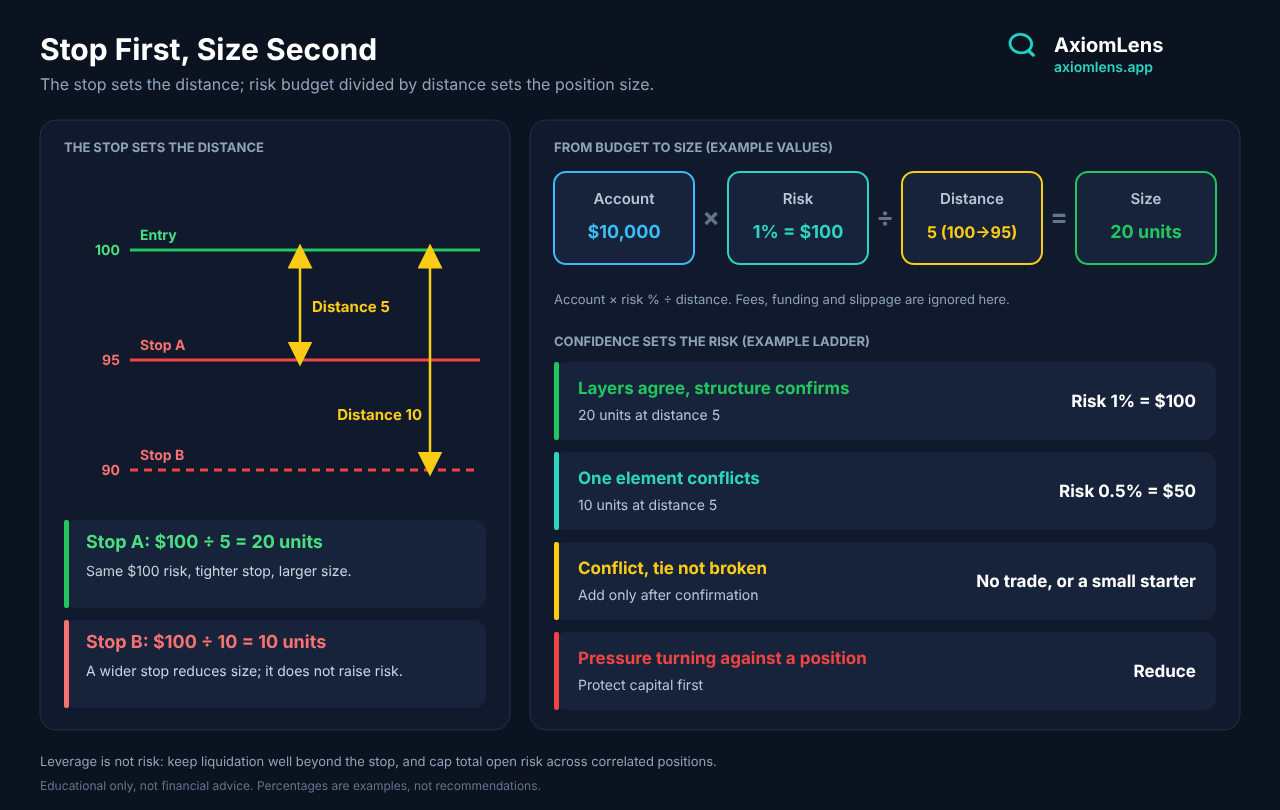
Position size = risk amount(Money you are willing to risk) ÷ distance from entry to stop Loss.
A Simple Numerical Example:
Suppose you have $10,000 in your account and you decide to risk 1% of it, which is $100.
You plan to buy the asset at $100, and your stop-loss is set at $95. The distance between these two points is 5 units.
How is the position size calculated?
Position size = $100 ÷ 5 = 20 units (a notional value of $2,000).
Now consider another scenario: if you decide to set your stop-loss at $90, the distance becomes 10 units, and your position size is cut in half to 10 units. Notice this key relationship: A wider stop-loss doesn't increase your total risk; it reduces your position size so your $100 dollar risk stays exactly the same.
Quick note: Exchange fees, funding rates, and price slippage make actual losses slightly higher; always leave a small buffer for them.
2. First Stop-Loss: Where the Idea Fails
A stop-loss isn't an emergency button to press because you're scared; it is the point that proves your analysis was wrong. A few practical tips:
Use Market Structure: Don't place your stop-loss on round numbers. Place it just beyond a significant swing high or low where, if the price breaks it, your scenario is completely invalidated.
Liquidity and Heatmaps: Many traders cluster their stop-losses at obvious levels. The market often sweeps these pools. Placing your stop-loss slightly beyond these crowded zones can help protect your trade, but it increases the distance and therefore reduces your position size.
Never Move Your Stop-Loss Backwards! If the price moves against you, you have zero right to push your stop further away to avoid taking a loss. If the idea is invalidated, the stop-loss must do its job. If a logical stop-loss is too far for the size you can handle, the correct response is smaller position size or no trade, not a fake, meaningless stop-loss.
3. Leverage Is Not Risk!
Many people think high leverage equals high risk. That's a misconception:
Leverage only determines how much margin you borrow from the exchange.
Real risk is determined by your position size and stop-loss distance.
A trade with high leverage, a small size, and a tight, logical stop can be completely safe. Conversely, a trade with low leverage, massive size, and no stop-loss is like walking on the edge of a cliff!
In leveraged positions, the liquidation price must be kept far away from your stop-loss. If the exchange liquidates you before your stop-loss is hit, the exchange is making decisions for you, not your trading plan.
4. Adjusting Risk Based on Confidence
Markets are rarely perfect. You should scale your risk up or down depending on how confident you are in the setup:
Everything looks great and all indicators align — Example Risk Per Trade: Maximum normal risk ceiling (e.g., 1%)
One conflicting element is present — Example Risk Per Trade: About half of normal risk (e.g., 0.5%)
Indicators are completely contradictory — Example Risk Per Trade: Do not trade! Or take a tiny starter size
Heavy market pressure against your position — Example Risk Per Trade: Reduce risk; protect your capital first
5. Considerations When Holding for Days
Holding a position for days (for example 1 to 20 days) brings a few practical considerations:
1. Wider stop, smaller size: Stops placed from 4-hour or daily structure are usually farther away, so the same risk budget buys fewer units.
2. Holding costs: On perpetual futures, funding is paid or received repeatedly. Depending on its sign, holding for days can add a cost or a credit; factor it into your plan.
3. Weekend and liquidity risk: Crypto trades around the clock, but liquidity can be thinner at weekends, and sharp moves can slip past your stop. A smaller size is the main protection; lower leverage and a safe distance to liquidation also help.
4. Fewer trades: Longer holds and wider stops mean fewer setups, so each decision deserves a solid checklist.
6. Total Risk and Market Correlation
Risking per trade is only half the picture. Crypto assets are highly correlated (they move together like a chain). If you open three different long positions on various altcoins, you've essentially built one giant correlated position!
Set a cap for your total open risk (e.g., total risk across all active stop-losses shouldn't exceed a certain percentage of your account).
Plan ahead how you will react to a losing streak—such as reducing per-trade risk after consecutive losses so your process stays intact.
7. Reward-to-Risk Ratio (R)
The distance to your profit target divided by the distance to your stop-loss gives you your Reward-to-Risk ratio (R).
At R = 1 (reward equals risk), you need to win about 50% of the time just to break even.
At R = 2, you need to win about 33% of the time. The goal isn't blindly chasing crazy high R ratios, but verifying before entry whether the potential reward justifies the risk, using realistic targets (like the next liquidity pool) rather than wishful thinking.
8. Entry, Scaling, and Position Management
Staggered Entry: If your confidence isn't 100%, enter with a partial risk size and only add more once price action confirms your thesis. Recalculate total risk after every addition.
Moving Stop-Loss: Once the price moves in your favor, you can trail your stop-loss to lock in profits. Only move your stop in the direction of reducing risk.
Partial Take-Profits: Taking profit at predetermined levels locks in results and reduces overall risk.
Exiting: If your invalidation level is hit, exit without hesitation. A properly sized position makes this decision completely bearable.
9. A Complete Step-by-Step Example
Suppose a market resistance breaks, the 4-hour chart supports it, but the daily chart hasn't confirmed yet. Your checklist says: "Small size."
1. Account & Budget: $10,000 balance. Normal risk is 1%, but due to a conflicting signal, we reduce it to 0.5%. Risk amount = $50.
2. Stop-Loss: Invalidation level sits just below the retest zone, clear of the liquidity cluster. Entry at $100, stop-loss at $95; distance = $5.
3. Position Size $50 ÷ 5 = 10 units (a notional value of $1,000).
4. Liquidation Check: With moderate leverage, the liquidation price is safely below $95. Good.
5. Plan: If price holds above the level and daily confirmation follows, add to the position while keeping total risk within the 1% budget, and trail the stop. If $95 breaks, exit and accept the $50 loss.
10. Common Mistakes to Avoid
Emotional Sizing: Saying "I just feel this one is a sure thing!" is not a risk calculation.
Confusing Leverage with Risk: Risk comes from size and stop-loss distance, not leverage.
Widening Your Stop-Loss: Moving your stop away to avoid taking a loss turns a planned small loss into an unmanaged disaster.
Adding to Losers: Pouring more money into a trade that is moving against your thesis.
Ignoring Correlation: Multiple similar trades equal one massive concentrated risk.
Revenge Trading: Trying to recover losses with oversized trades after a losing streak.
Conclusion
Position Size = Risk Amount ÷ Distance from Entry to Stop-Loss. The stop-loss determines the distance, and the distance determines the position size!
Leverage is not risk; keep an eye on your liquidation price.
Place your stop-loss where your idea fails. A wider stop means buying less, not taking more risk.
Set a cap for your total market risk and count correlated trades together.
Never move your stop-loss backwards and never add size to a losing trade.
O. H.
Founder, AxiomLens
(This article is an educational piece from the AxiomLens content series and is by no means a buy or sell signal).